A new platform
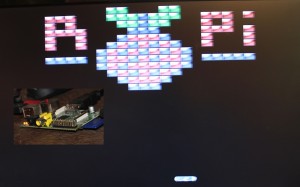
With all the buzz surrounding the raspberry pi (an arm-based embedded Linux platform) at the time of it’s release, I decided to buy one. After fiddling around with the Wheezy terminal and checking out a few applications, I decided to write a game for it. As a challenge, I decided to use C++ and have the thing be hardware accelerated. After thinking for a short while and sketching some mockups in Photoshop, a breakout clone was decided upon; and so began research into libraries to assist me.
Libraries on libraries
At the time of writing, at least, there was no existing C++ framework wrapping OpenGL (ES) on the raspberry pi that I could find. After almost an hour of searching in corners of the internet though, I found an (at the time) unfinished GLES framework written in C (link). So I spent a couple of hours mashing up an object-oriented library, with entity support, wrapping the existing C library. The source can be downloaded at the end of this post, but just for demonstration’s sake, this is the sort of thing that the library wraps:
GLESapp::GLESapp( GLESlogic &logic ) : quit(false), num_frames(0), l(logic) {
    if (makeContext() != 0) {
        std::cout << "Failed to create OpenGL context, exiting." << std::endl;
        exit(-1);
    }

    std::cout << "OpenGL context created at " << getDisplayWidth() << "x" << getDisplayHeight() << " pixels" << std::endl;

    std::cout << "Initialising viewport" << std::endl;

    // Bunch of OpenGL initialisation stuff
    glActiveTexture(GL_TEXTURE0);
    glViewport(0, 0, getDisplayWidth(), getDisplayHeight());
    initGlPrint(getDisplayWidth(), getDisplayHeight());
    initSprite(getDisplayWidth(), getDisplayHeight());
    glCullFace(GL_BACK);
    glEnable(GL_CULL_FACE);
    glBlendFunc(GL_SRC_ALPHA, GL_ONE_MINUS_SRC_ALPHA);
    glEnable(GL_BLEND);
    glDisable(GL_DEPTH_TEST);
    glClearColor(0.0f, 0.0f, 0.0f, 1); // Background colour (black)

    std::cout << "Hooking input" << std::endl;

    keys = getKeys(); // Get pointer to key array
    mouse = getMouse(); // Same for mouse

    std::cout << "Creating debug font" << std::endl;
    font1 = createFont("glesfw/resources/textures/font.png",0,256,16,16,16);

    std::cout << "Calling user-defined logic" << std::endl;

    l._SetApp(this);
    l.Init();
}
Entity support is present in a class who’s methods can be overloaded as such:
class myEntity : public GLESentity {
public:
    virtual void Init() { /* Called when object is created */ }
    virtual void Update() { /* Called every frame */ }
    virtual void Destroy() { /* Called just before an object is destroyed */ }
};
The methods are automagically called once an entity has been added to an applications or deleted with these members:
GLESapp::AddEntity( GLESentity *e )
GLESapp::DeleteEntity( GLESentity *e )
//e.g
GLESapp a(logic);
a.AddEntity( new myEntity );
a.Run(); // myEntity will delete itself when the program terminates
Time for the game
So, after initially demoing the library a little, I set to work on the actual game. First task was to figure out how levels would actually be constructed; I settled on a custom filetype that would be loaded for each level. Photoshop was used to create images at quite a low resolution (20×12 – with lots of magnification!), which were then fed through a little python script (I used PIL, which made the task wonderfully simple):
from PIL import Image
i=Image.open("pitiny.png")
pt = {}; cnt = 1
for y in range(0,i.size[1]):
    for x in range(0,i.size[0]):
        cp = i.getpixel( (x, y) )
        try:
            if pt[cp] != 1:
                print pt[cp], x, y
        except:
            pt[cp] = cnt
            cnt += 1
            if pt[cp] != 1:
                print pt[cp], x, y
Below is a snippet of what the script spits out; they are just pretty long files with a list of block types and x, y coordinates following:
3 15 5
3 19 5
4 5 6
3 6 6
Which were then loaded into the program via C++’s standard library (this listing is the application’s overloaded Init() routine):
virtual void Init() {

    // Open a file and read the level out of it
    std::ifstream ifs;
    ifs.open("pi_xy.dat", std::ios::in);

    if( !ifs.is_open() ) {
        throw std::runtime_error("Could not load level \'pi_xy\'");
    }

    while(1) {
        int type, x, y;
        ifs >> type >> x >> y;
        if(ifs.eof()) break;
        if( type > 0 && type < 5 )            app->AddEntity( new Block(x*60 + getDisplayWidth()/2-(60*20/2), y*40+40, type) );
    }

    ifs.close();

    // After loading the level, add a bat
    app->AddEntity( new Bat( getDisplayWidth()/2, getDisplayHeight()-70 ) );
}
For a peek into how independent entities were coded, here is the listing for the Bat class. It responds to input from the keyboard and moves left or right with smooth velocity changes, and draws itself with a PNG texture loaded from a file (Members inlined for clarity):
class Bat : public GLESentity {
public:
    Bat(float xp=0, float yp=0) { this->x=xp; this->y=yp; v=0;}
    virtual void Init() {
        this->tid = app->GetTextureFromPNG("bat.png");

        // Set width & height (Note if this is not set the sprite is too small to see)
        this->w = 120;
        this->h = 30;
    }

    virtual void Update() {
        // Check keys and move accordingly
        if( app->keys[KEY_CURSL] )
            v -= 3;
        else if ( app->keys[KEY_CURSR] )
            v += 3;
        else
            v += -(v/10.0); //Slowly reduce velocity when no keys down

        // Clamp bat to screen, bouncing off corners
        if( this->x > getDisplayWidth()-60 ) { this->x = getDisplayWidth()-60; v = -v*0.4; }
        if( this->x < 60 ) { this->x = 60; v = -v*0.4; }

        x += v; // Apply the velocity

        app->DrawEntity(this);
    }

    virtual void Destroy() { }
    float v;
};
The compilable source + binaries with raspi-compatible Makefile are available here. I don’t claim supreme ownership over the library (much of the more complex OpenGL routines are handled by Chris’s C library!), so use it for whatever you like, following Chris’s license also; crediting me would be nice but not required. As it stands, the application is unfinished (there’s no ball yet, only a level and a moving bat!), but I believe it still demonstrates the capabilities of the raspberry pi and I obtained a pretty sizable chunk of Linux development knowledge from making this application. If school slows down a little I might have a crack at ball physics in the near future (I wonder if Box2D would compile on the RasPi..).


